
Cloud Storage Access (Beta)
To ingest assets from your AWS S3 bucket into the Coactive platform, you first need to establish a secure connection that allows Coactive to access your data. There are two supported methods:
- IAM Role - create a role in your AWS account that Coactive can assume, offering fine-grained control and audibility.
- Bucket Policy - where you directly grant Coactive’s role permission to access your bucket without needing to manage IAM roles.
Both methods ensure secure, read-only access and are designed to fit different levels of technical complexity and security requirements.
Managing connections in the UI
Section titled “Managing connections in the UI”You can also create, edit, test, and delete connections directly from the Coactive web interface. Go to Profile Menu → Settings → Connections to access the Connections management page. The UI supports AWS IAM Role (with S3 or Bedrock scope), HTTPS Basic Auth, and HTTPS Bearer Token connection types.
The Connections page always displays a default Coactive connection at the top of the list. This Coactive-managed connection is used with the bucket policy method (see Method 2 below) and cannot be edited or deleted.
Note: The Settings menu is only visible to Organization Admins.
🔍 Prerequisites
Section titled “🔍 Prerequisites”You’ll need:
- Your AWS account logged in at https://console.aws.amazon.com
- Your S3 bucket name that has the assets to be uploaded
- Your AWS Account ID
- The Coactive IAM Role ARN:
arn:aws:iam::863104360228:role/coactive-external-connectionsMethod 1: IAM Role Assumption
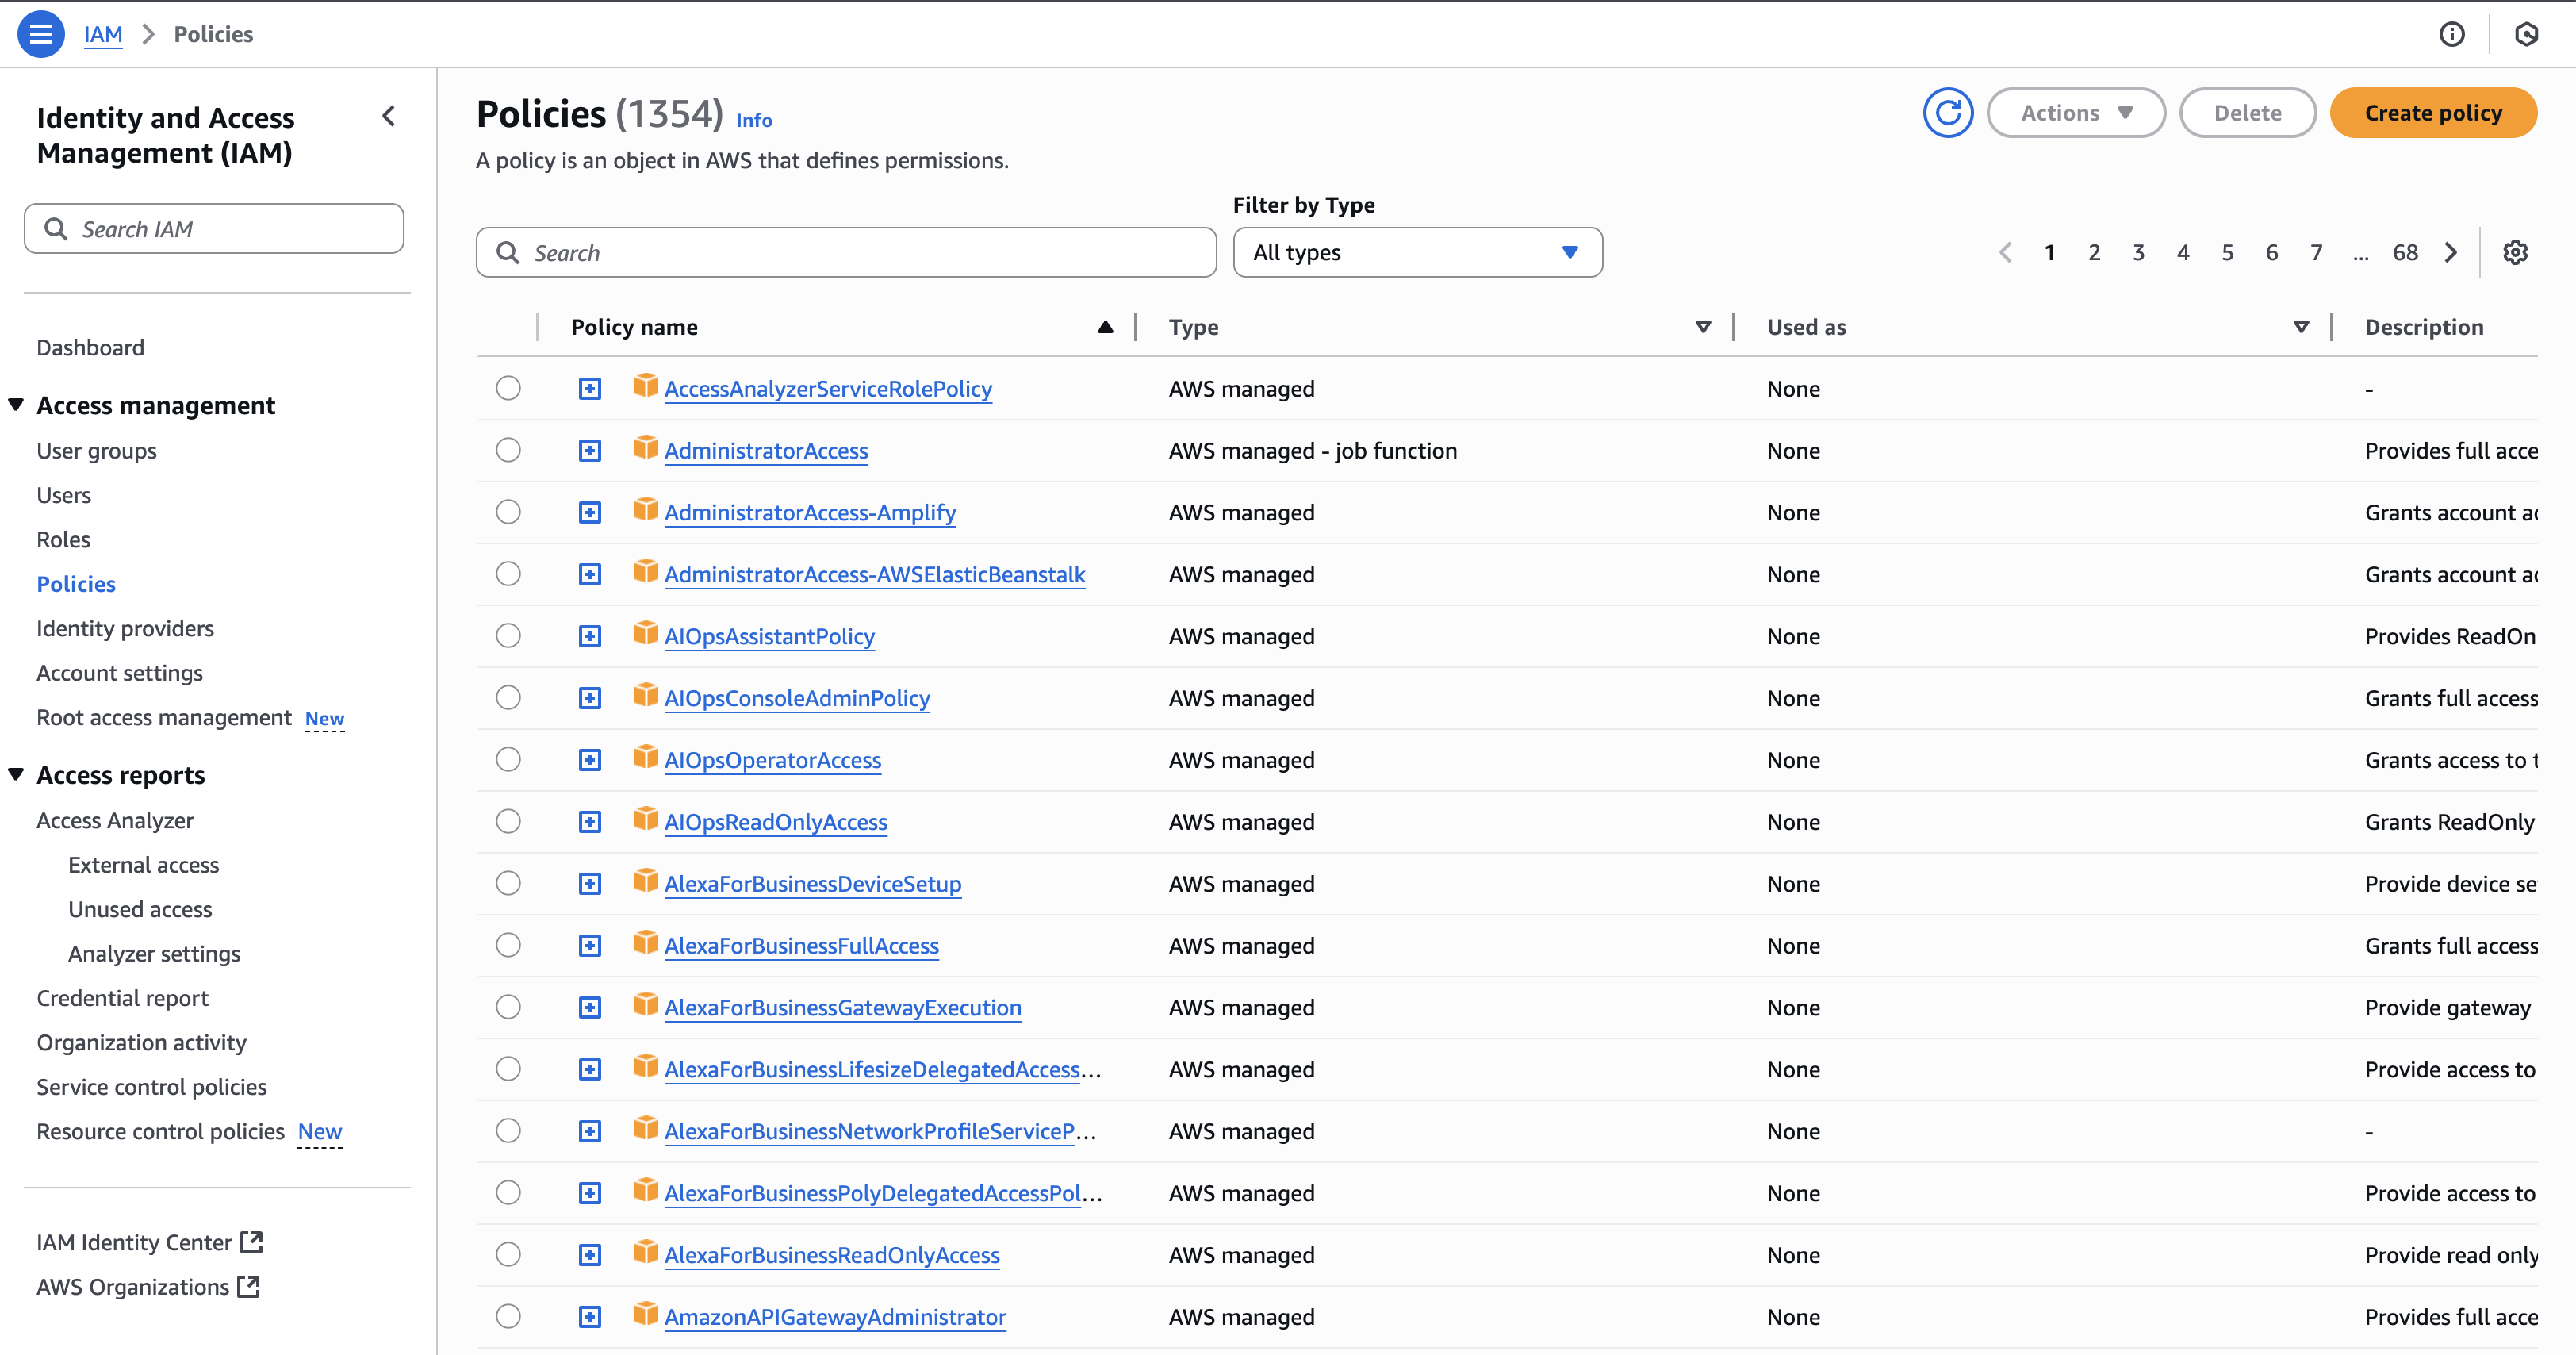
Section titled “Method 1: IAM Role Assumption”Step 1: Go to the IAM Console
Section titled “Step 1: Go to the IAM Console”- Go to the AWS Console: https://console.aws.amazon.com/iam
- In the left sidebar, click “Policies”
- In the top-right corner, click the “Create policy” button
🔐 Step 2: Create a Custom S3 Access Policy
Section titled “🔐 Step 2: Create a Custom S3 Access Policy”You’ll now define a policy to allow Coactive to read your dataset.
1. In the “Create Policy” screen:
Section titled “1. In the “Create Policy” screen:”- Click the “JSON” tab at the top
2. Add this statement with your given S3 Bucket name
Section titled “2. Add this statement with your given S3 Bucket name”{ "Version": "2012-10-17", "Statement": [ { "Effect": "Allow", "Action": ["s3:Get*", "s3:List*"], "Resource": [ "arn:aws:s3:::<bucket-name>", "arn:aws:s3:::<bucket-name>/*" ] } ]}- Please replace
<bucket-name>with your bucket name. arn:aws:s3:::<bucket-name>refers to the bucket itself — this allows Coactive to perform bucket-level operations such as listing objects (e.g.,s3:ListBucket). This is required to view the contents or structure of the bucket during ingestion.arn:aws:s3:::<bucket-name>/*refers specifically to all objects inside the bucket You are also able to specify a prefix here witharn:aws:s3:::<bucket-name>/prefix/*. This grants Coactive permission to read the actual image and video files within that folder (e.g.,s3:GetObject).
Together, these ensure that Coactive can:
- See what objects exist in the dataset folder
- Access and ingest the individual assets for processing
This approach adheres to AWS best practices by limiting access to only the necessary bucket and subfolder.
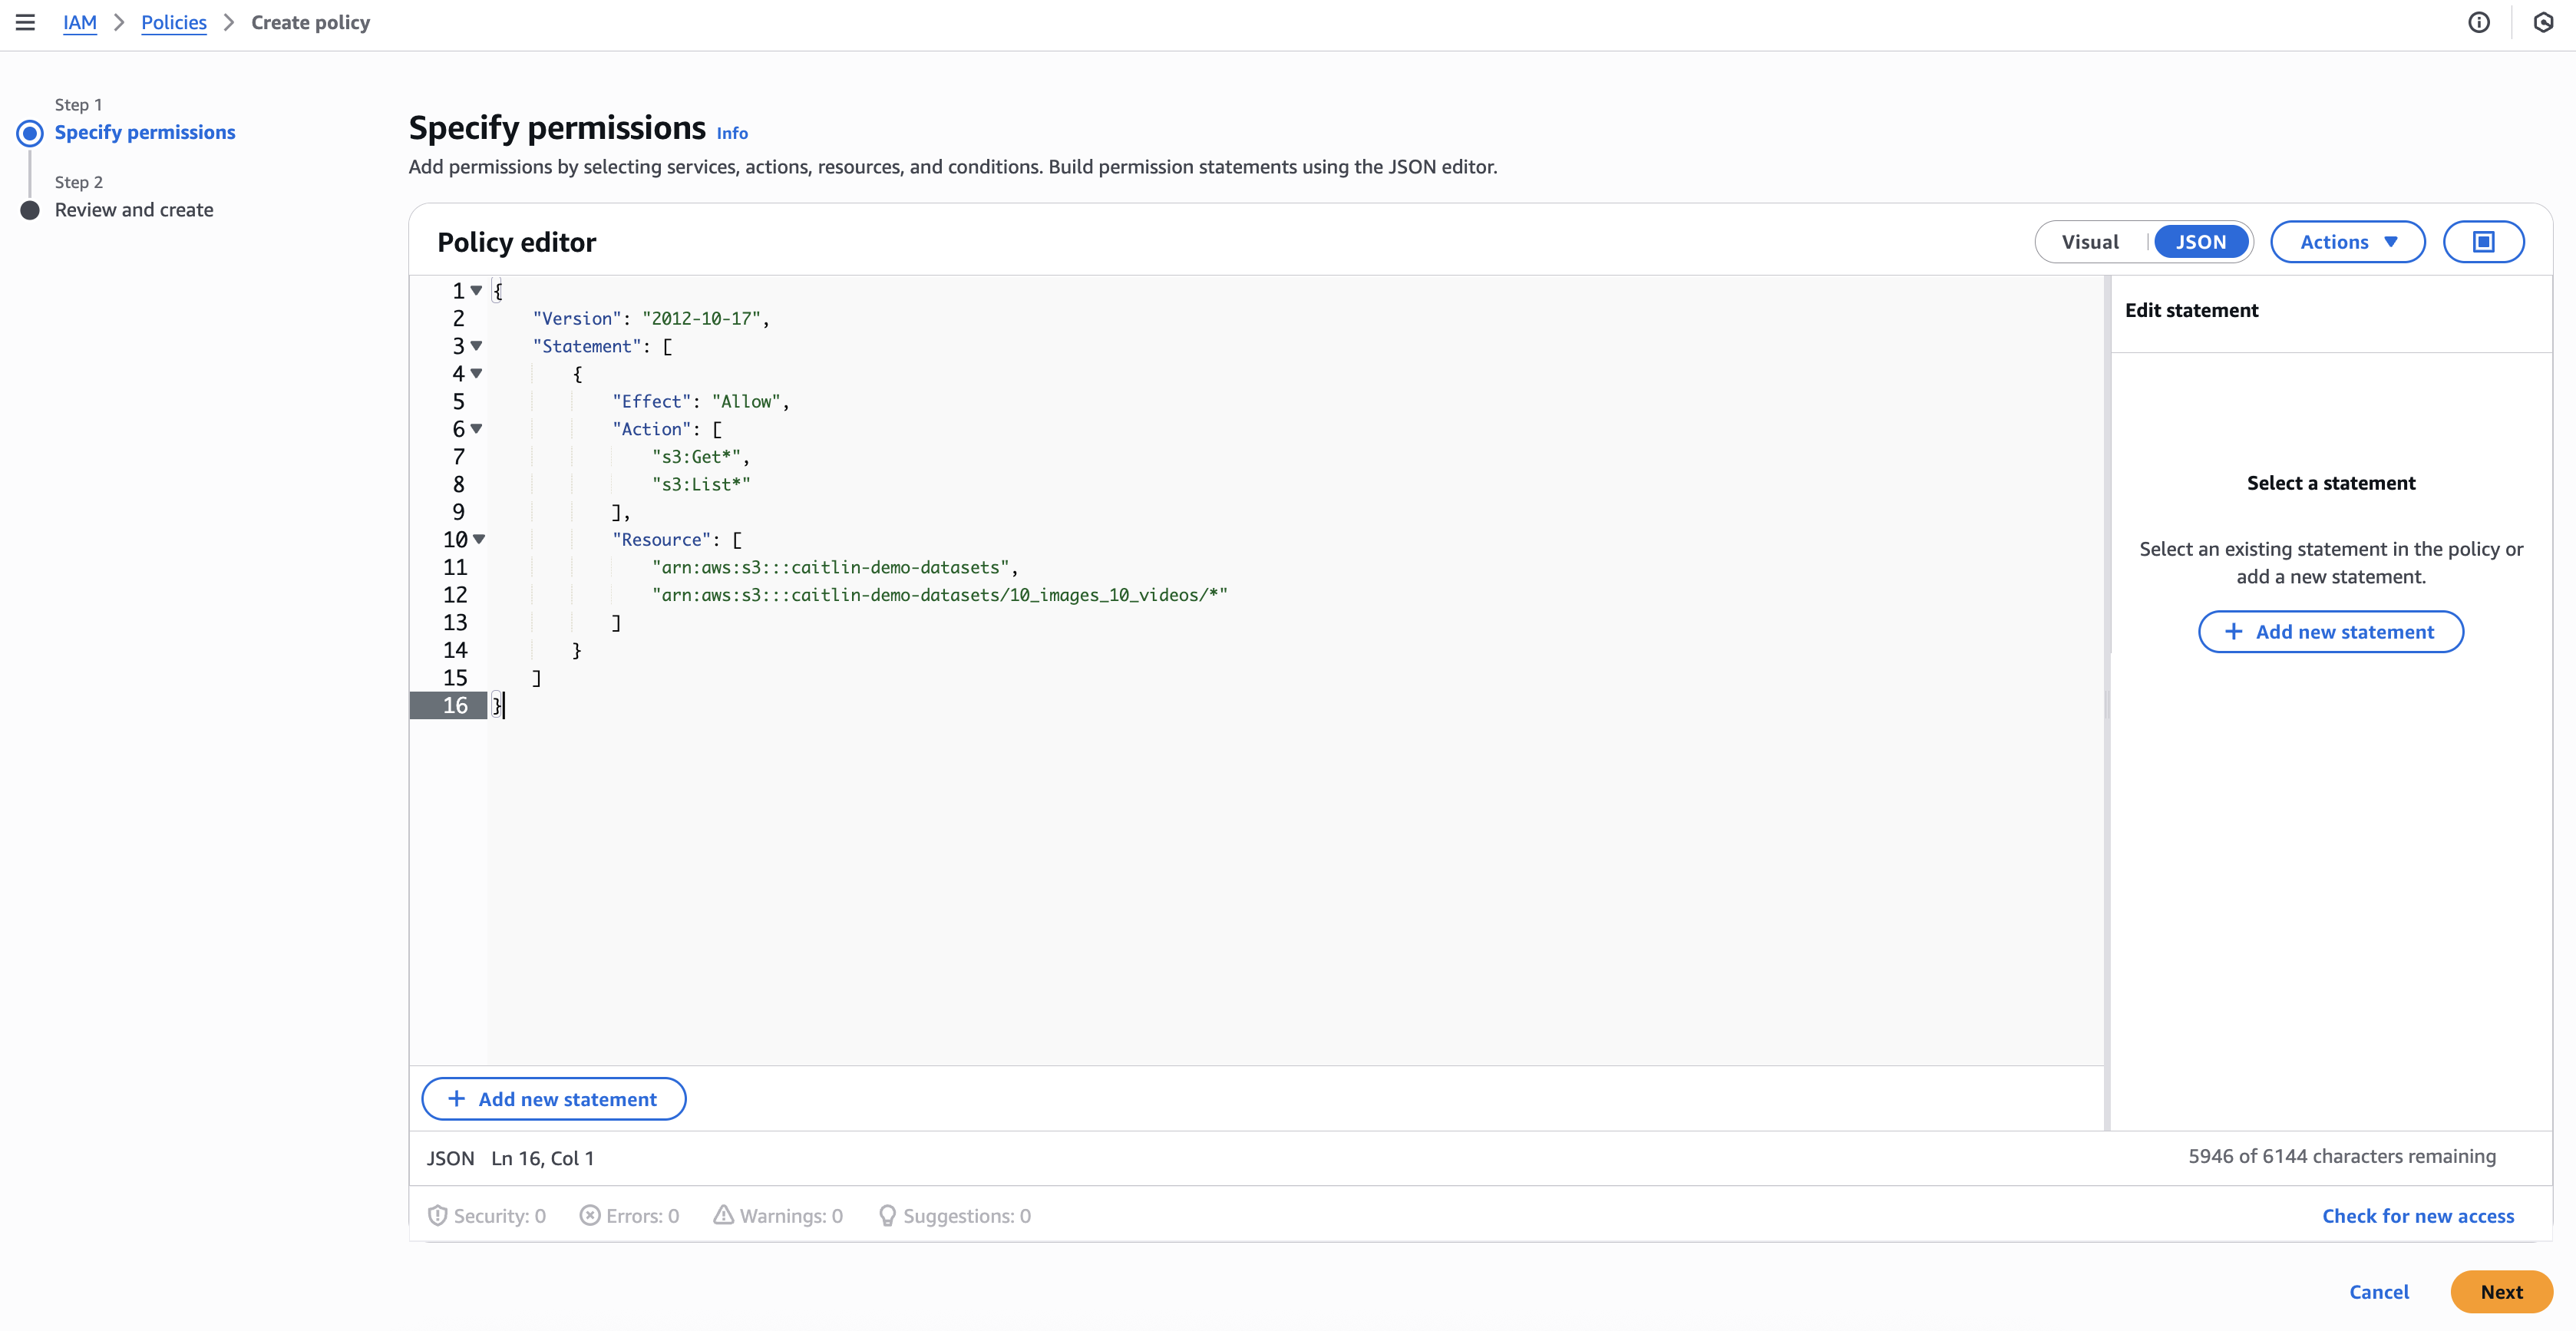
3. Click Next (bottom-right)
Section titled “3. Click Next (bottom-right)”4. Add Policy Details
Section titled “4. Add Policy Details”- Add a policy name: A clear and descriptive name indicating that this policy grants access to a specific S3 bucket, intended for Coactive’s ingestion process.
- Add a description (optional): Policy that allows Coactive to access images and videos in my S3 bucket.
- Click Create policy
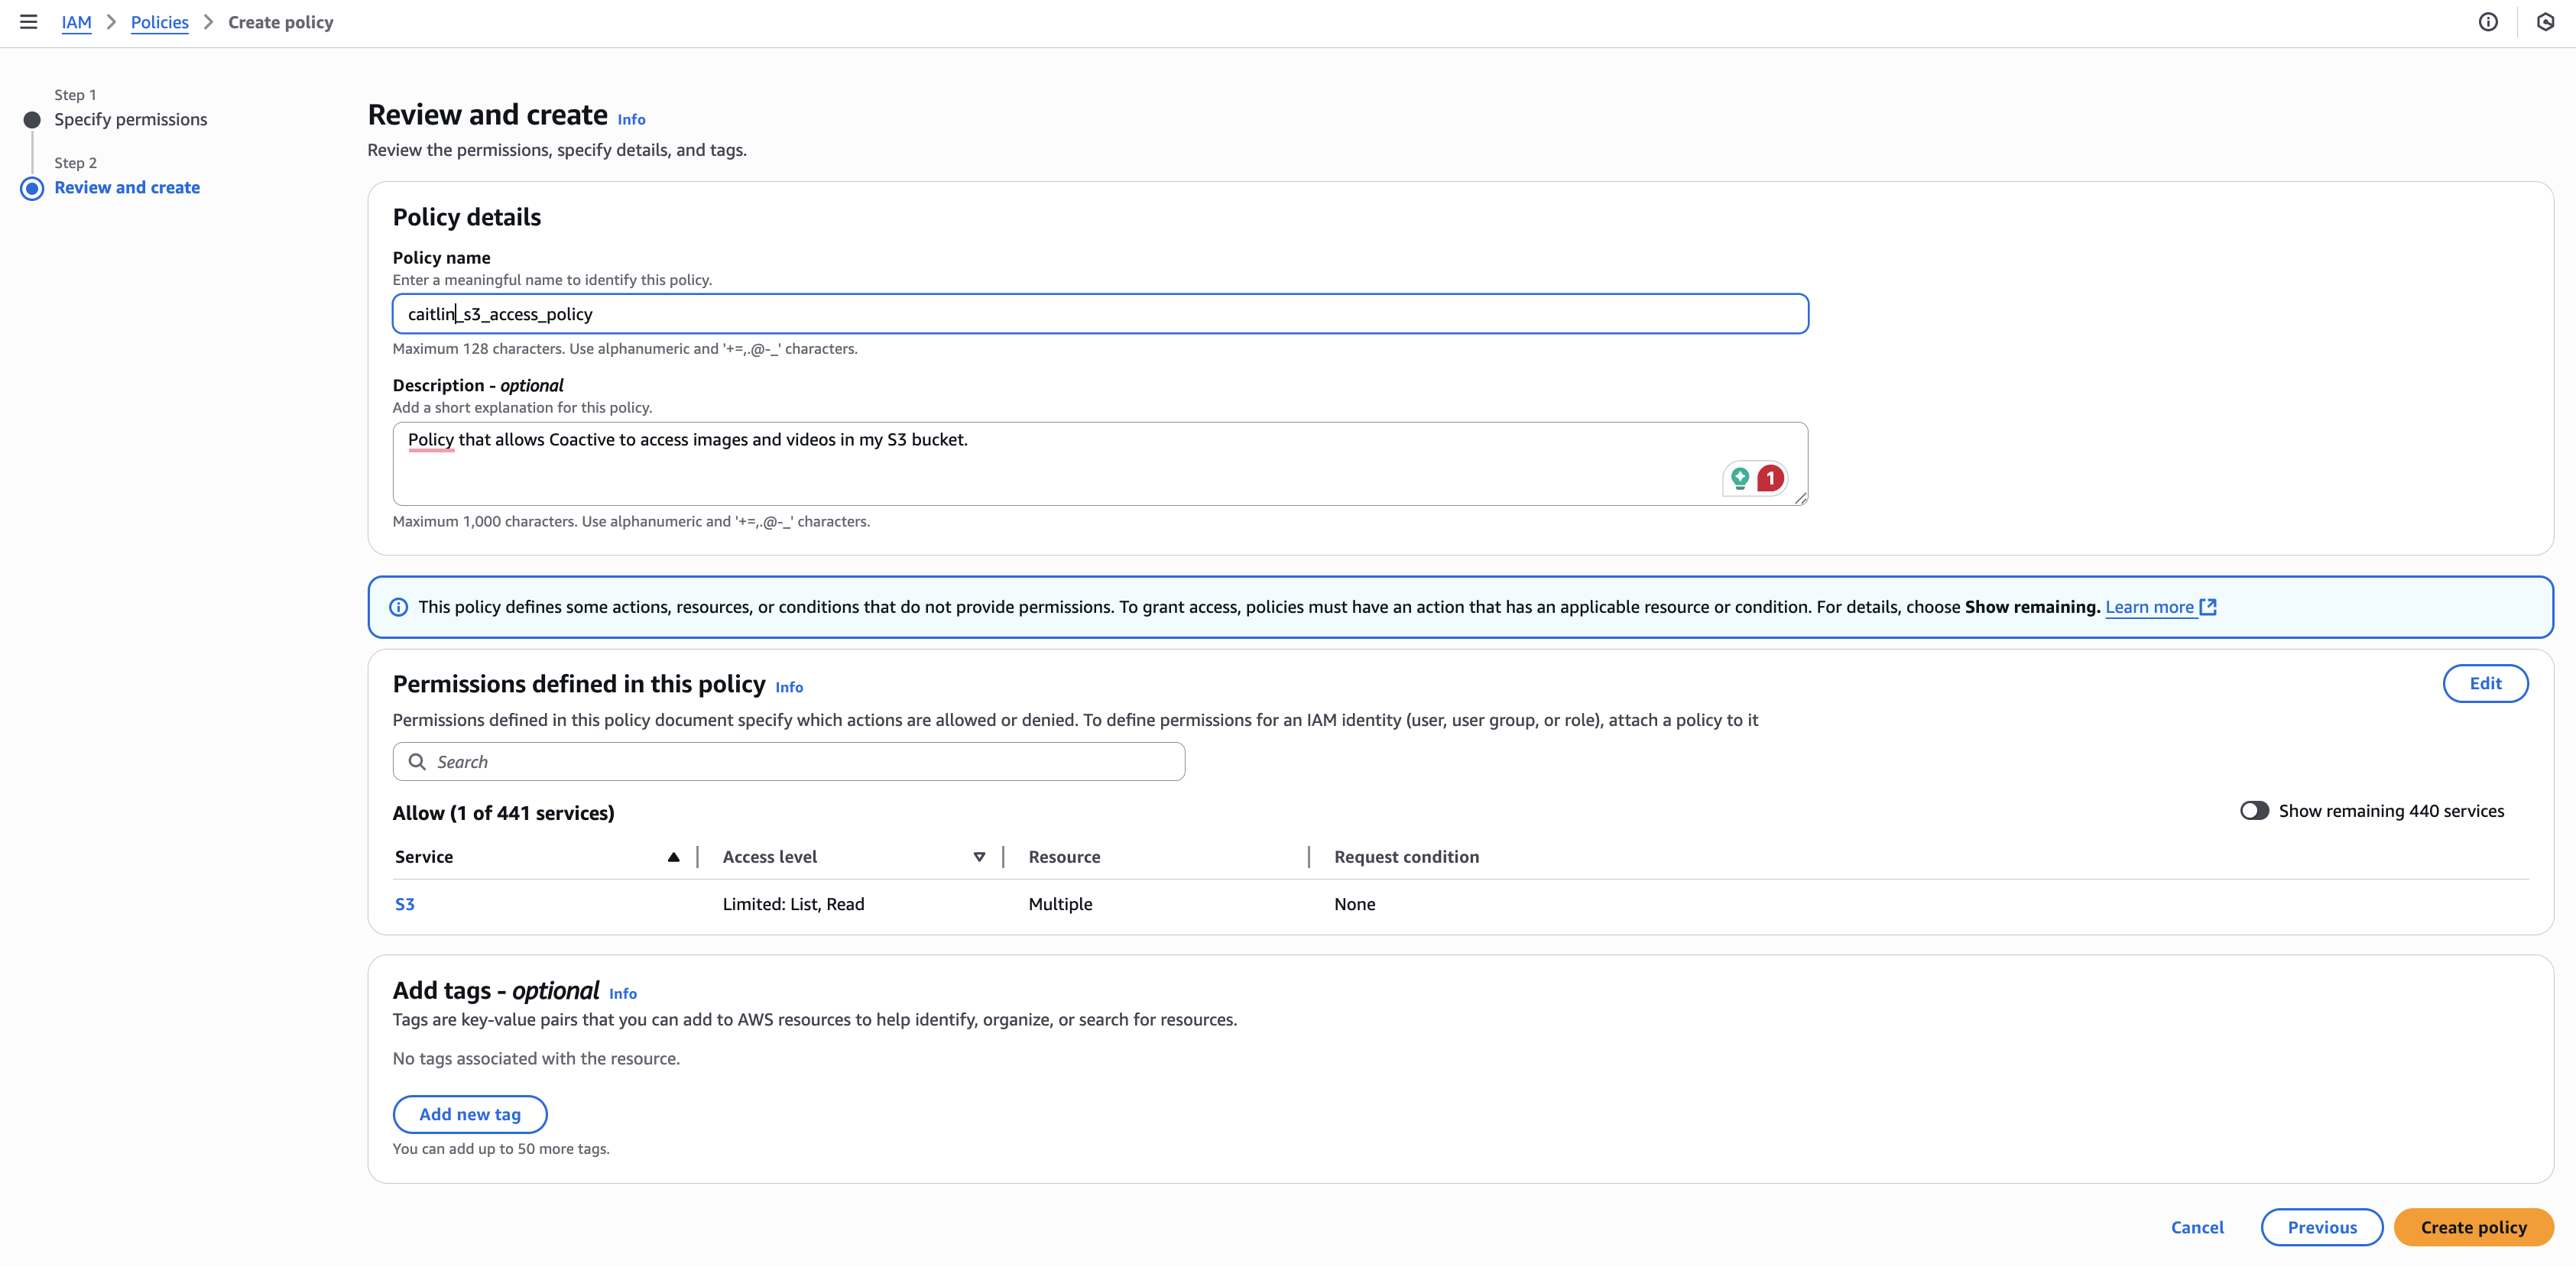
- You’ll be returned to the “Policies” page. Your policy is now ready to attach to a role.
🛠️ Step 3: Create a New IAM Role
Section titled “🛠️ Step 3: Create a New IAM Role”- In the left sidebar, click “Roles”
- In the top-right corner, click “Create role”
🧑🤝🧑 Step 4: Choose Trusted Entity
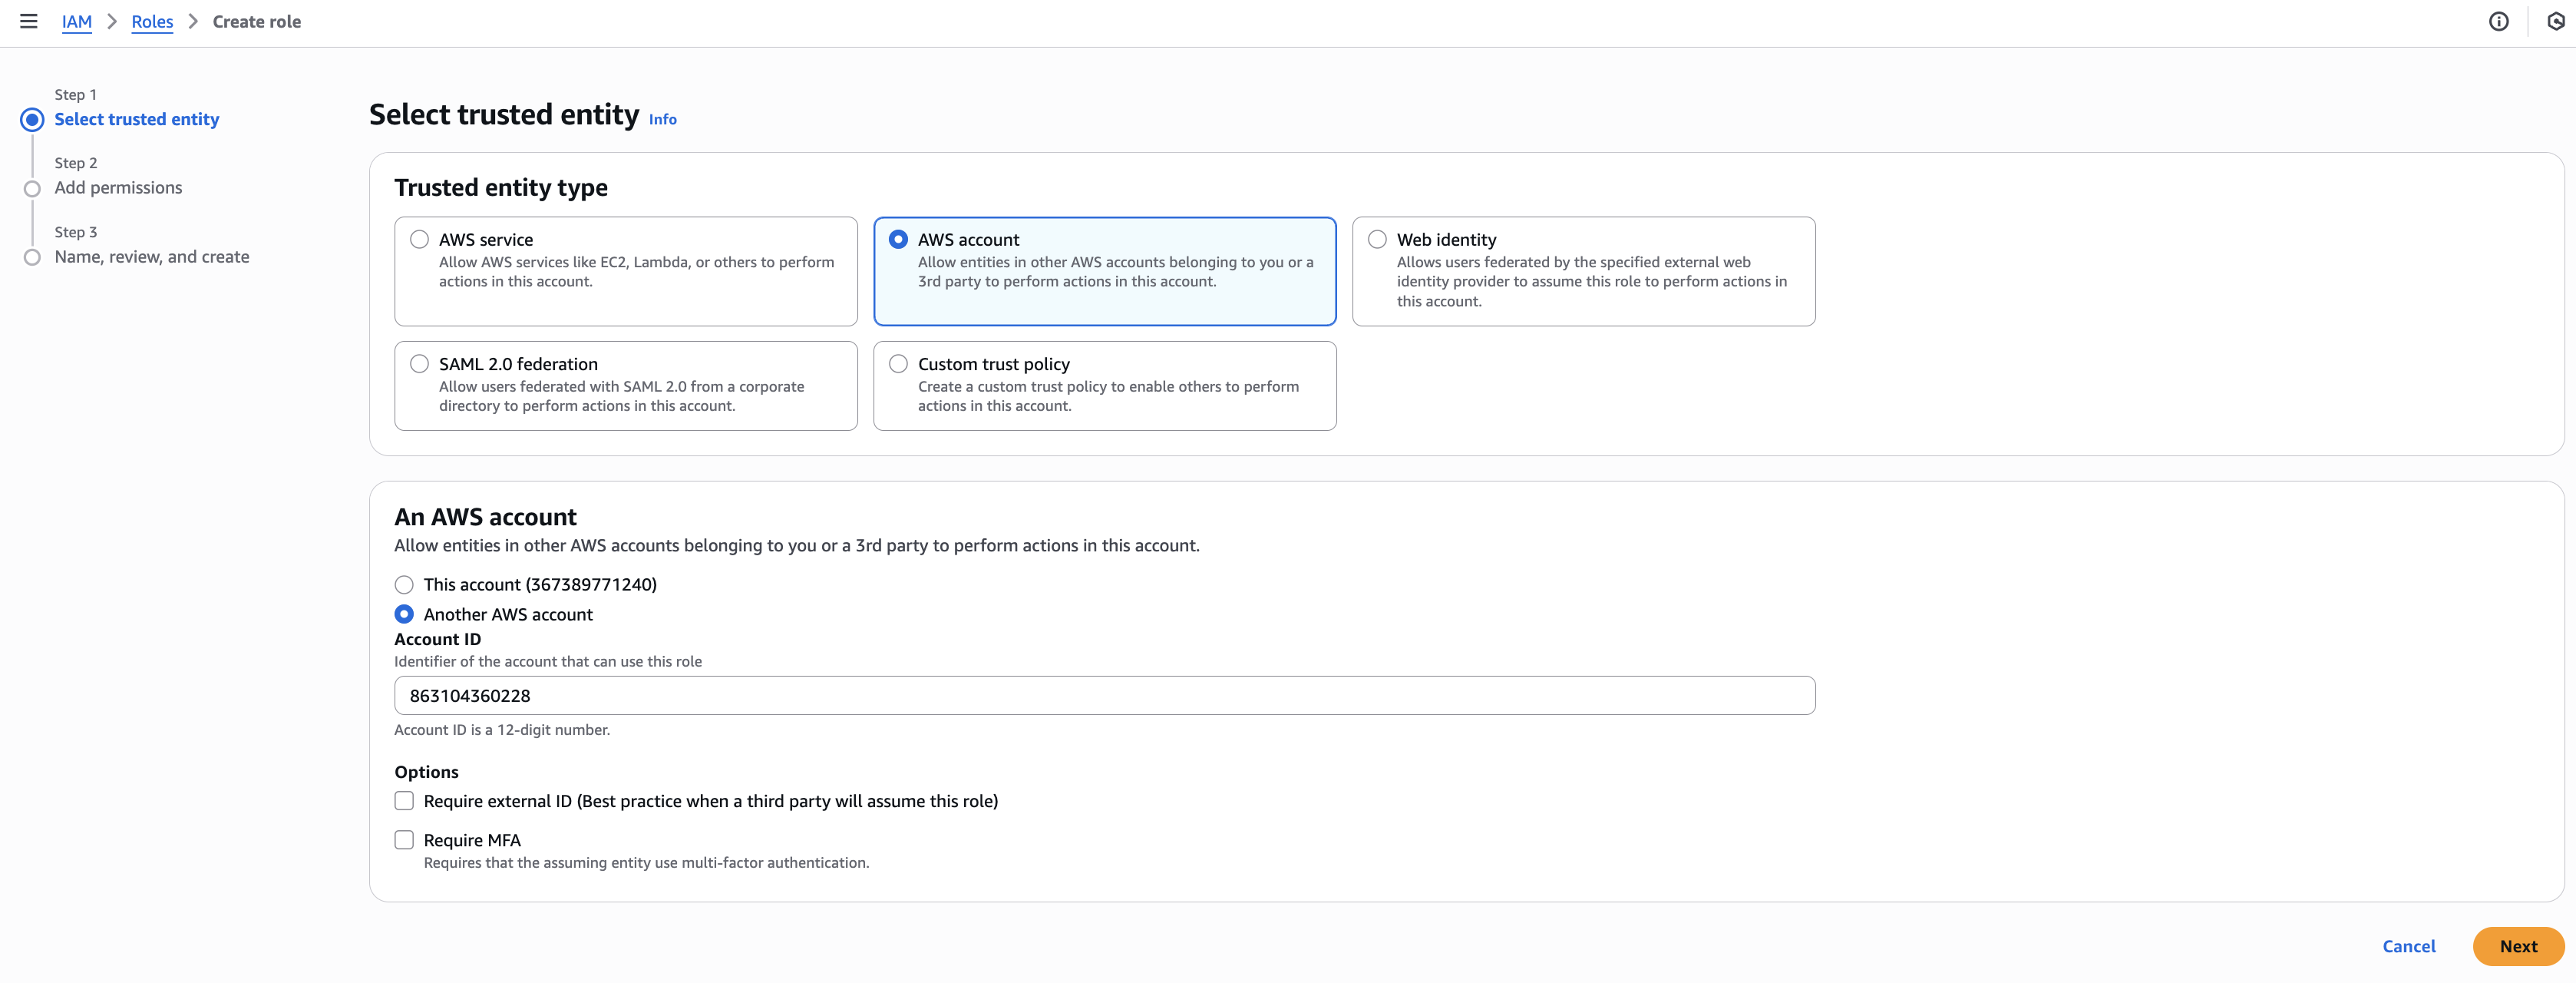
Section titled “🧑🤝🧑 Step 4: Choose Trusted Entity”You’ll now define who can use (assume) this role.
-
Under “Trusted entity type”, select: AWS account
-
Under “An AWS account ID”, select Another AWS account and paste:
863104360228(This is Coactive’s production AWS account)
-
Leave “Require external ID” unchecked
-
Click Next
📎 Step 5: Attach Your Custom S3 Access Policy
Section titled “📎 Step 5: Attach Your Custom S3 Access Policy”-
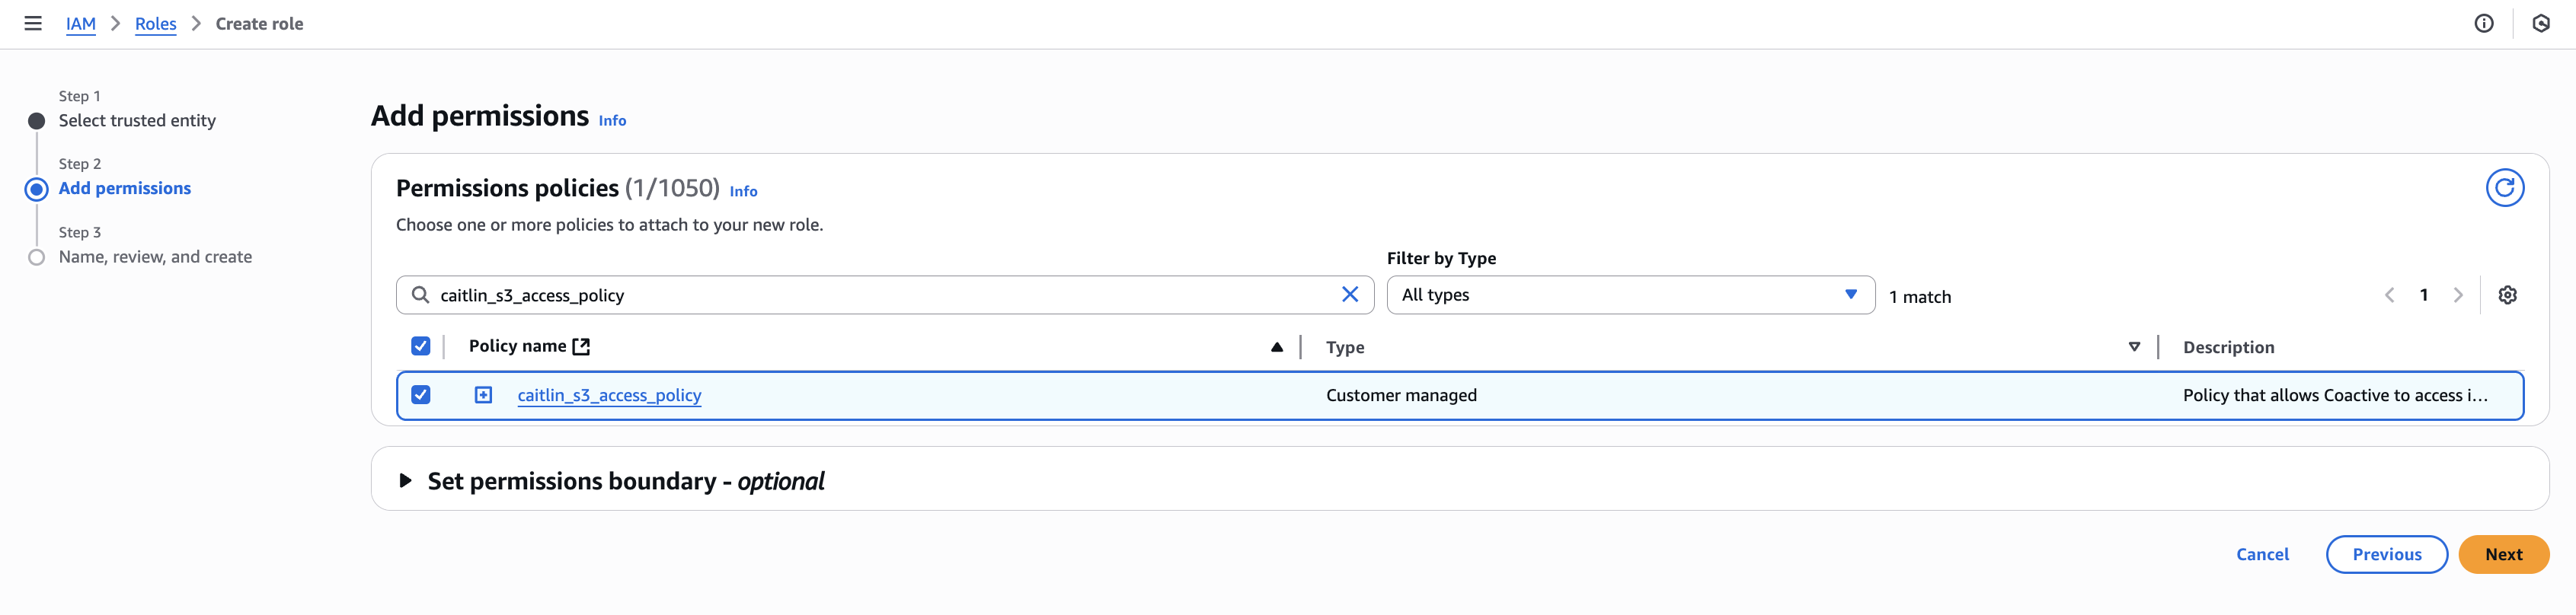
In the “Add permissions” screen:
- Click the 🔄 refresh icon at the top-right of the list
- In the search box, search for the policy name that you have just created
-
Check the box next to that policy to select it
-
Click Next (bottom-right)
🏷 Step 6: Name and Create the Role
Section titled “🏷 Step 6: Name and Create the Role”-
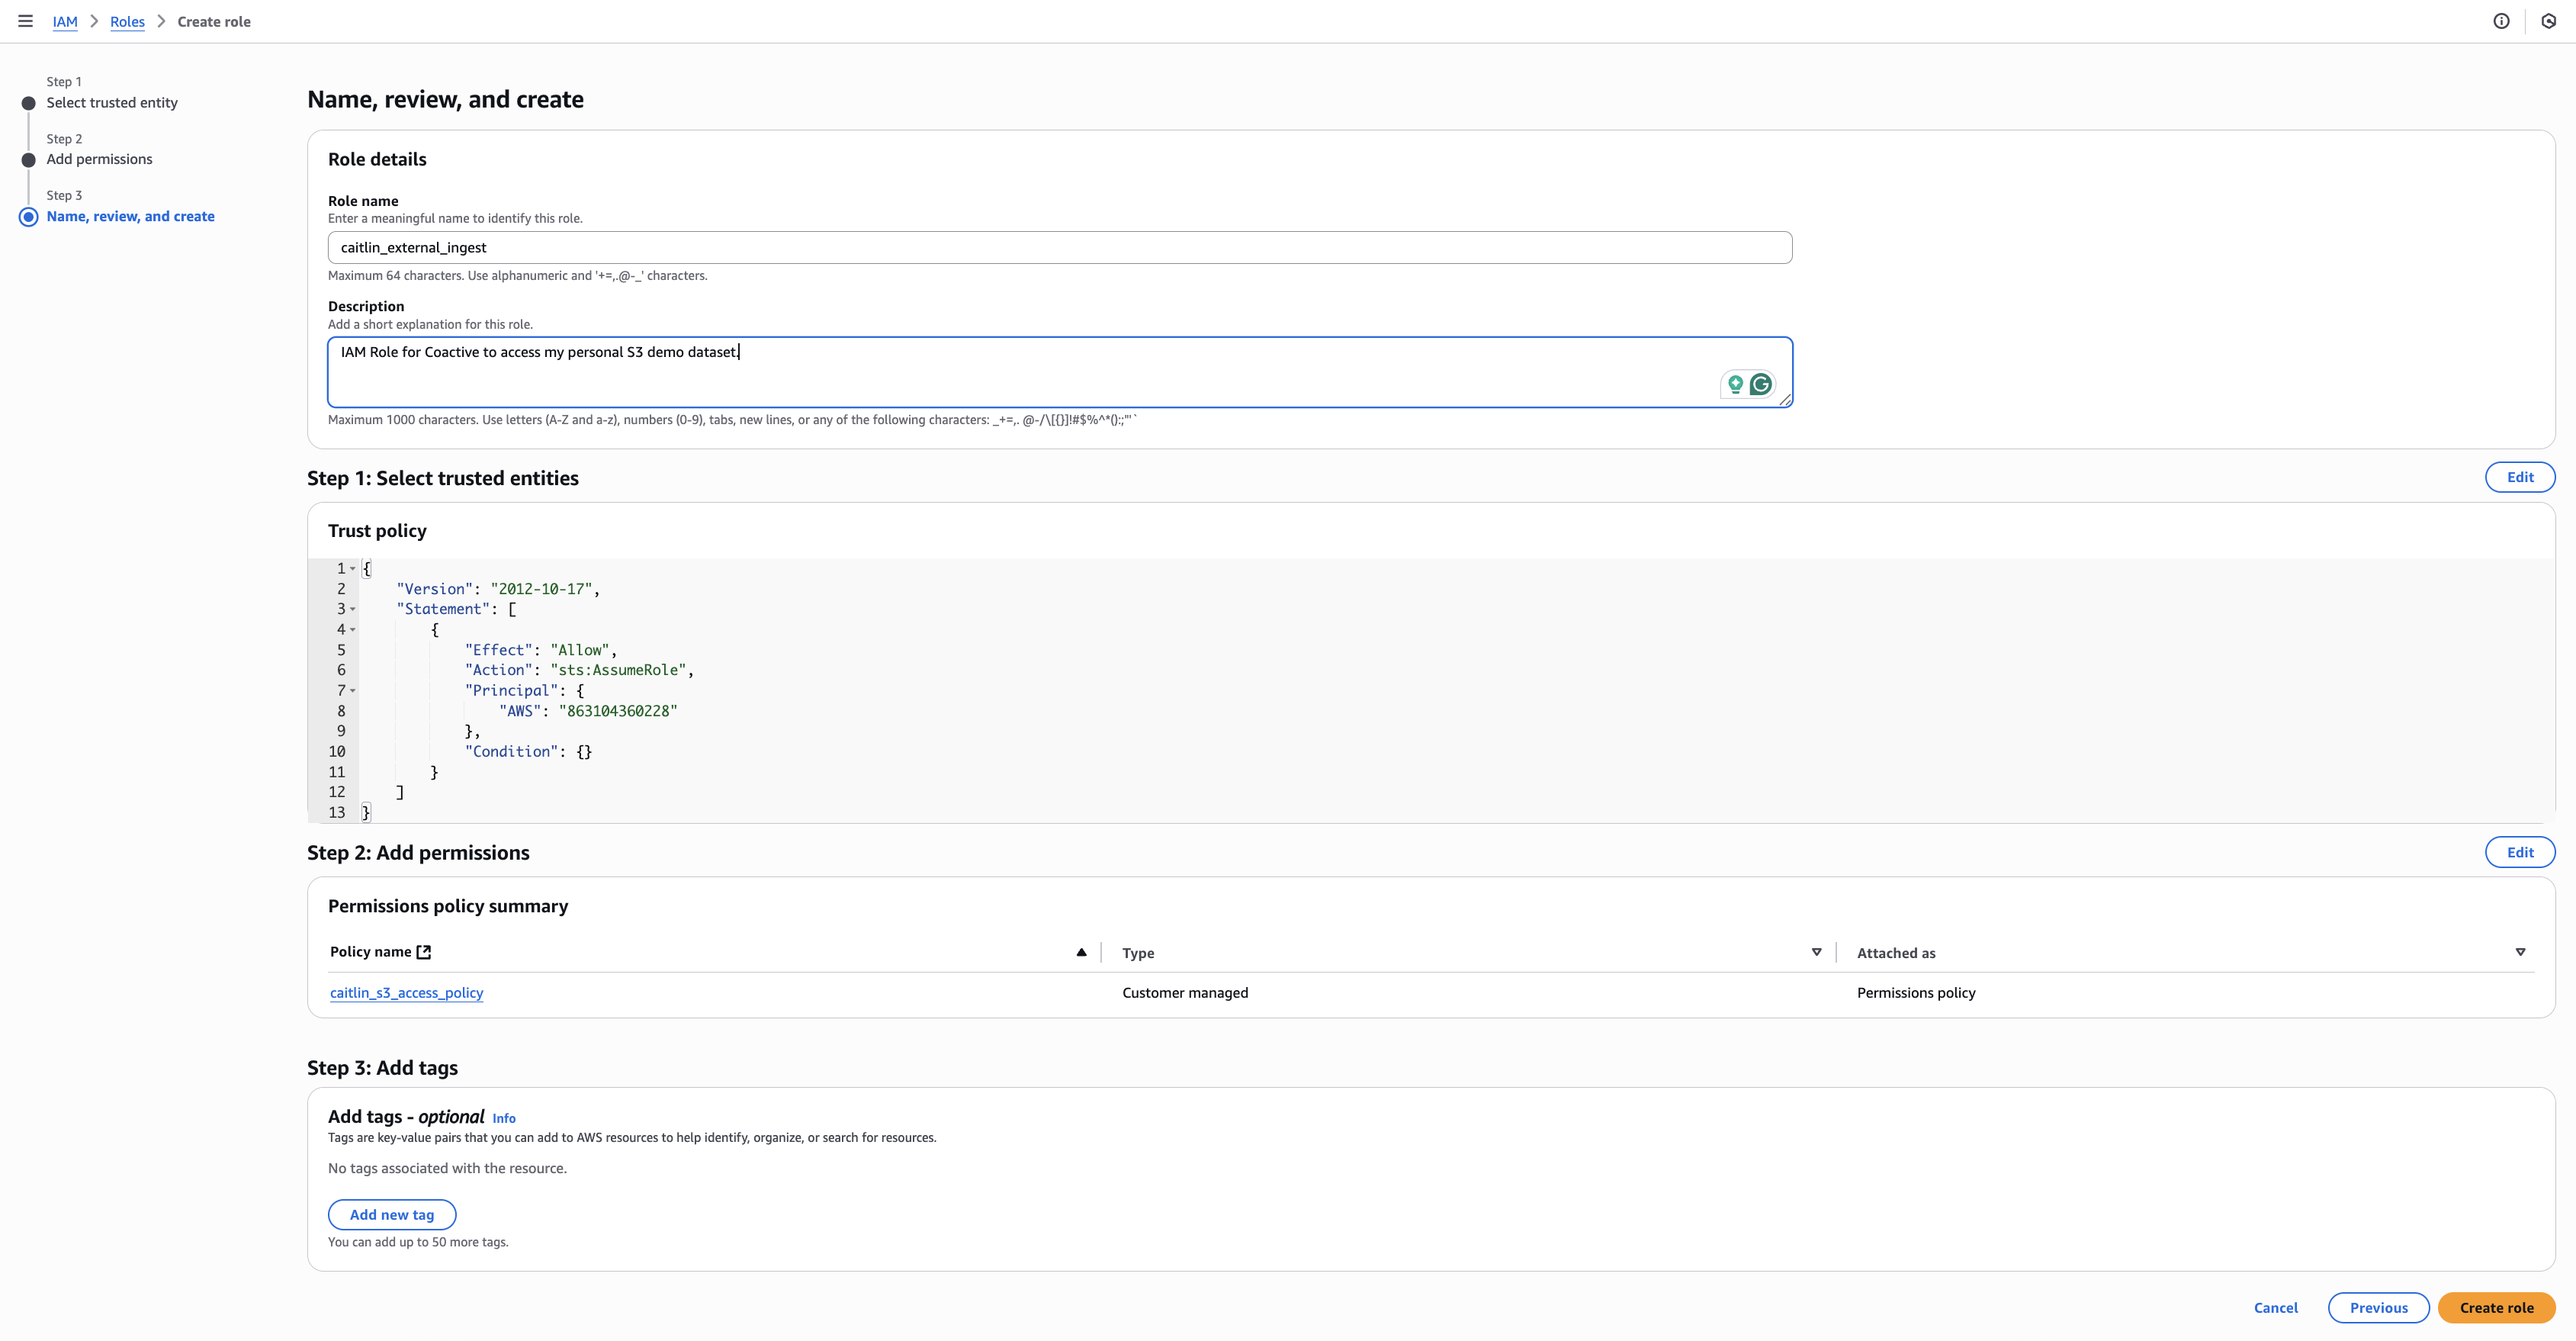
In the “Role name” field, enter a role name:
-
(Optional) Description:
IAM Role for Coactive to access my personal S3 demo dataset.
-
Click Create role
-
The role has now been created!
🔁 Step 7: Edit the Trust Relationship
Section titled “🔁 Step 7: Edit the Trust Relationship”Now you’ll tell AWS to trust only Coactive’s IAM role.
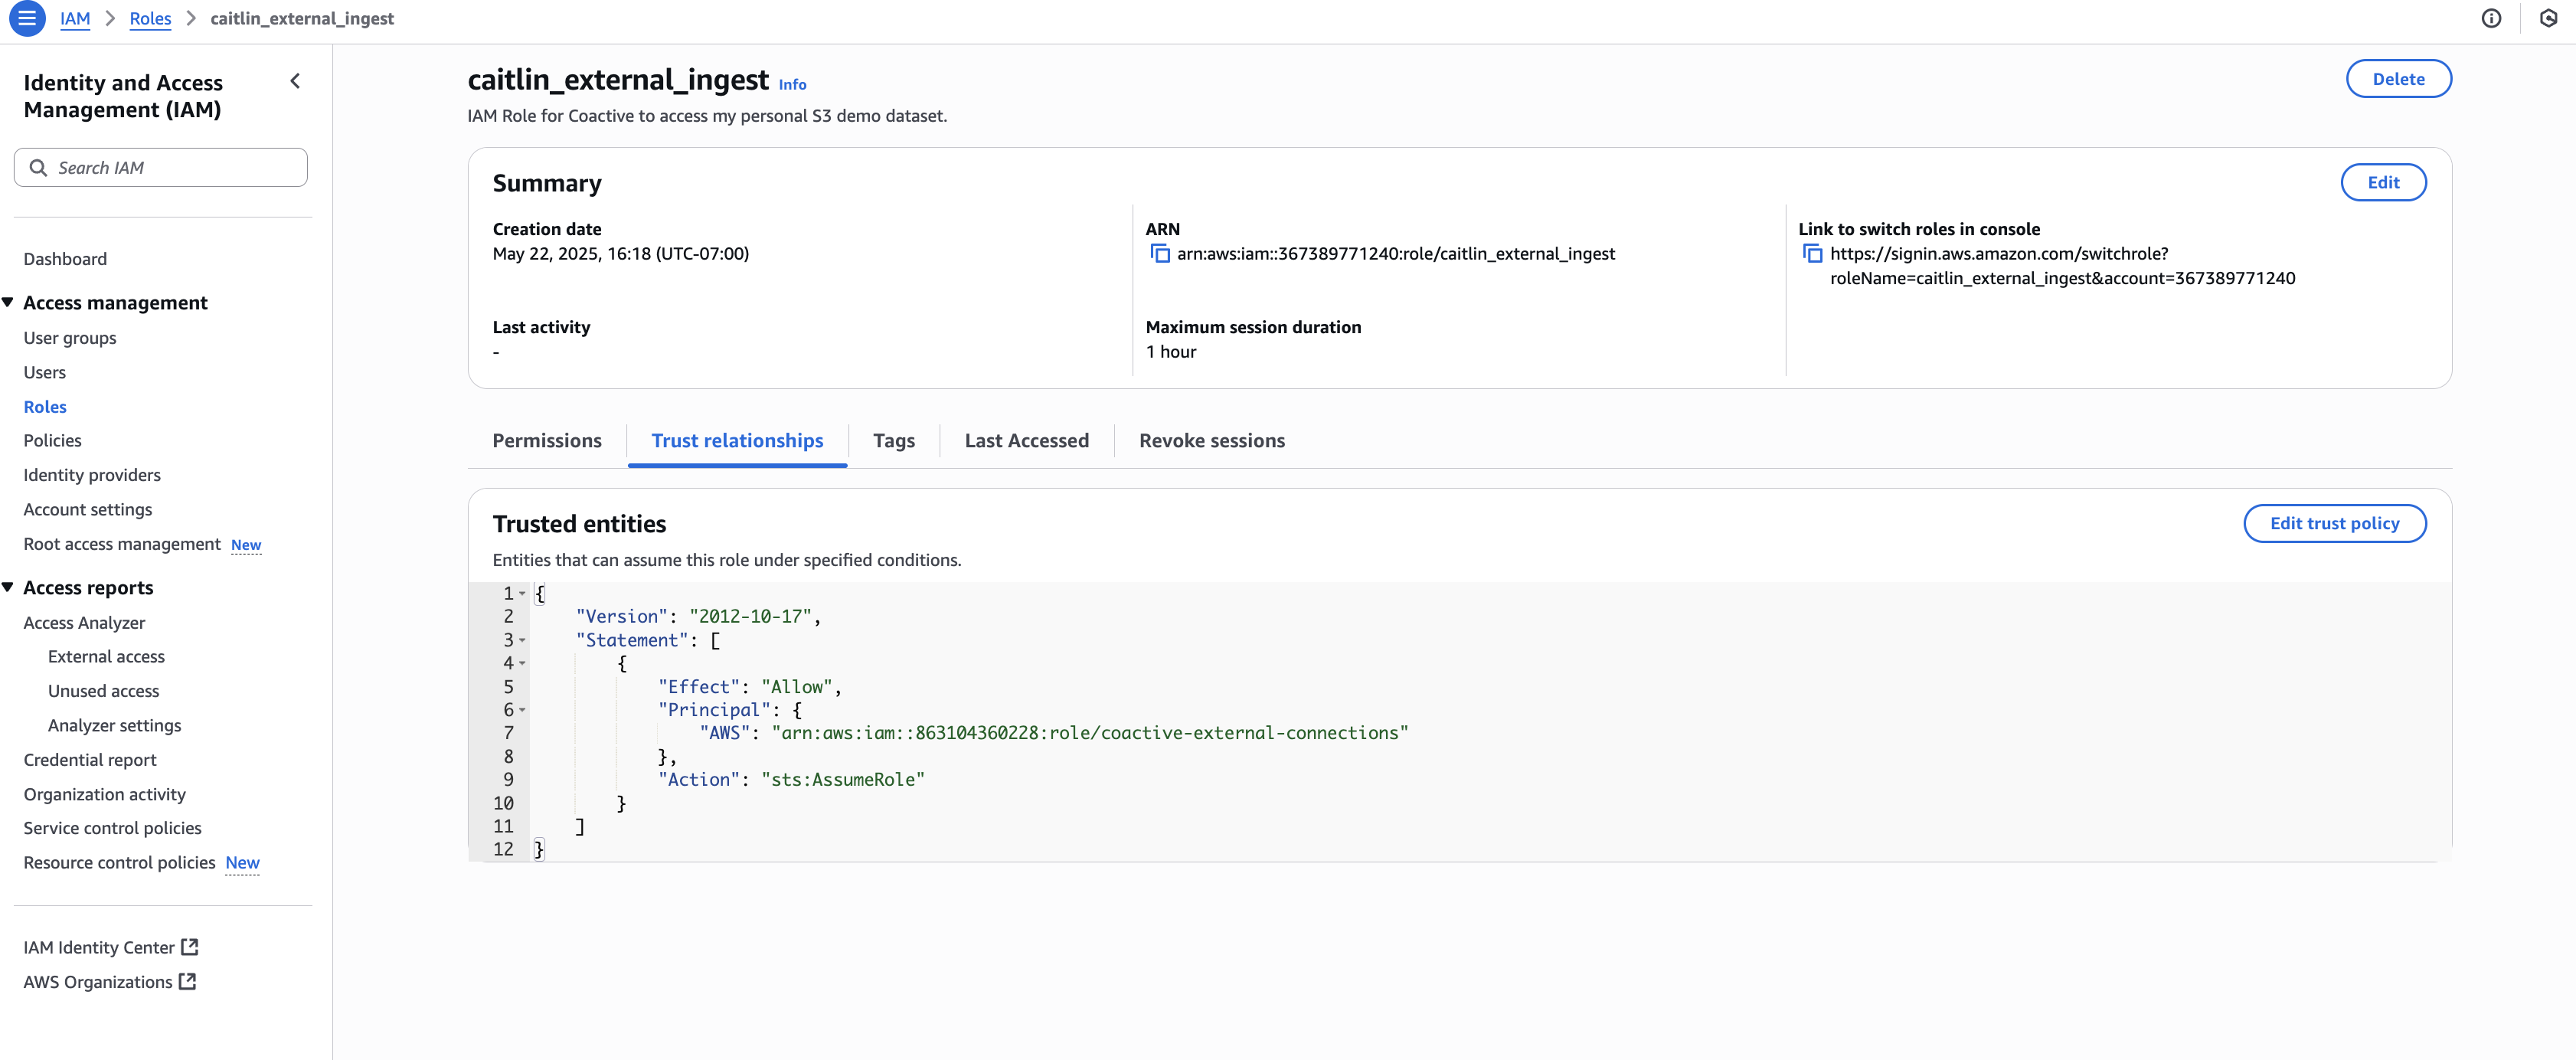
- On the roles list page, click on the role name that you have created.
- Click the “Trust relationships” tab
- Click “Edit trust policy”
- Replace the existing text with this:
{ "Version": "2012-10-17", "Statement": [ { "Effect": "Allow", "Principal": { "AWS": "arn:aws:iam::863104360228:role/coactive-external-connections" }, "Action": "sts:AssumeRole" } ]}Click “Update policy”
🔑 Step 8: Copy the Role ARN
Section titled “🔑 Step 8: Copy the Role ARN”You’ll need this to register the role with Coactive.
- Still on the role details page, look for the “ARN” at the top
- Copy it — it should look like this:
arn:aws:iam::<your-account-id>:role/<role-name>Step 9: Create the Connection in Coactive
Section titled “Step 9: Create the Connection in Coactive”Create a new Connection using the Role ARN from the previous step. You can do this through the UI or via the API.
Option A: Create via UI
Section titled “Option A: Create via UI”- In the Coactive web interface, go to Profile Menu → Settings → Connections (visible to Organization Admins only)
- Click New connection
- Select AWS IAM Role as the connection type
- Select a Scope:
- S3: For accessing assets in your S3 bucket (default)
- Bedrock: For connecting to AWS Bedrock services
- Fill in the required fields:
- Name: A unique name for your connection (e.g.,
my_s3_connection) - IAM Role ARN: Paste the ARN from Step 8
- Bucket name: Your S3 bucket name (S3 scope only)
- Session TTL (optional): Duration in seconds (60-3600, defaults to 3600)
- Test location (optional): An S3 path to verify the connection works (S3 scope only)
- Name: A unique name for your connection (e.g.,
- Click Create
Bedrock connections
Section titled “Bedrock connections”For Bedrock connections, contact your Coactive representative or email support@coactive.ai to complete the connection setup. Bedrock connections do not require a bucket name or test location.
Option B: Create via API
Section titled “Option B: Create via API”Use the Create Connection API with the following request body:
{ "name": "<CONNECTION_NAME>", "config" : { "iam_role_arn" : "<ARN_FROM_STEP_8>", "bucket_name" : "<BUCKET_NAME>" }, "test_location" : "s3://<BUCKET_NAME>/example_file.mp4", "type" : "aws_iam_role"}Step 10: Ingest Using the Connection Name
Section titled “Step 10: Ingest Using the Connection Name”Using the connection name created in the previous step, start your ingestion!
import httpx
http = httpx.Client()
response = http.post(    "https://api.coactive.ai/api/v1/ingestion/assets",    headers={        "authorization": "Bearer ACCESS_TOKEN"    },    json={        "dataset_id": "YOUR_DATASET_ID",  # Replace this with your real dataset ID        "connection_name": "<CONNECTION_NAME>",  # Key part here        "assets": [            {                "source_path": "s3://bucket-name/10_images_10_videos/image1.jpg", # Replace this with your real source_path                "metadata": {                    "label": "example"                }            }        ]    })
Method 2: Connect Coactive Using a Bucket Resource Policy
Section titled “Method 2: Connect Coactive Using a Bucket Resource Policy”This approach grants access directly to Coactive’s role via a bucket policy and no IAM role assumption is needed.
Step 1: Copy the Coactive Bucket Policy Template
Section titled “Step 1: Copy the Coactive Bucket Policy Template”Replace all instances of YOUR_BUCKET_NAME with your actual bucket name:
{ "Version": "2012-10-17", "Statement": [ { "Sid": "AllowCoactiveConnectionsListBucket", "Effect": "Allow", "Principal": { "AWS": "arn:aws:iam::863104360228:role/coactive-external-connections" }, "Action": "s3:List*", "Resource": [ "arn:aws:s3:::your-bucket-name" ] }, { "Sid": "AllowCoactiveConnectionsReadObjects", "Effect": "Allow", "Principal": { "AWS": "arn:aws:iam::863104360228:role/coactive-external-connections" }, "Action": "s3:Get*", "Resource": [ "arn:aws:s3:::your-bucket-name/*" ] } ]}Step 2: Add the Policy to Your S3 Bucket
Section titled “Step 2: Add the Policy to Your S3 Bucket”- Go to the AWS Console: https://console.aws.amazon.com/s3
- Click on your bucket
- Go to the “Permissions” tab
- Scroll down to “Bucket policy”
- Click Edit
- Paste the updated JSON into the editor
- Click Save changes. Now Coactive’s role has read access to your bucket!
Step 3: Ingest Using the Default Coactive Connection
Section titled “Step 3: Ingest Using the Default Coactive Connection”You do not need to create a connection — the default Coactive connection is already available and visible on the Connections management page (Profile Menu → Settings → Connections, visible to Organization Admins only). Reference connection_name: "coactive" in your ingestion call.
Here’s a tailored example for you:
import httpx
http = httpx.Client()
response = http.post(    "https://api.coactive.ai/api/v1/ingestion/assets",    headers={        "authorization": "Bearer ACCESS_TOKEN"    },    json={        "dataset_id": "YOUR_DATASET_ID",  # Replace this with your real dataset ID        "connection_name": "coactive",  # Key part here        "assets": [            {                "source_path": "s3://bucket-name/10_images_10_videos/image1.jpg", # Replace this with your real source_path                "metadata": {                    "label": "example"                }            }        ]    })